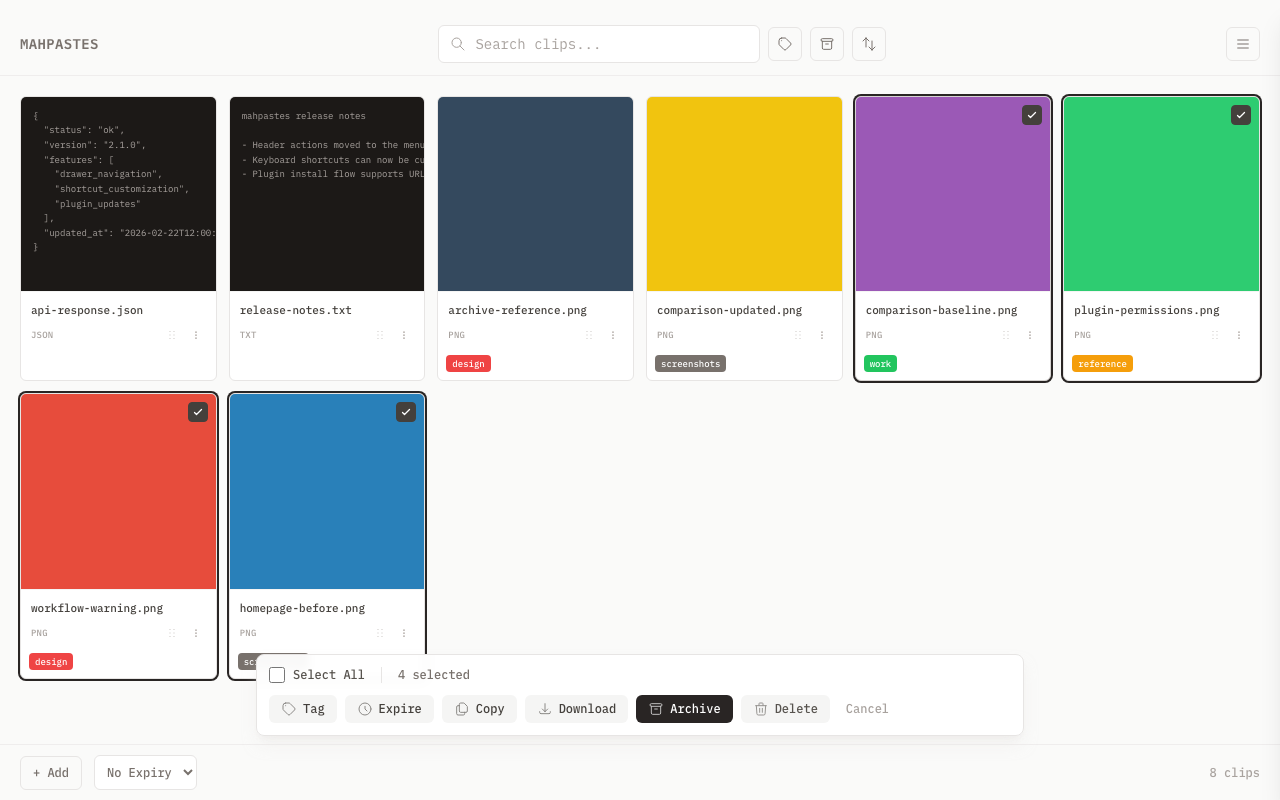
Bulk Actions
Select and operate on multiple clips at once. Archive, download, or delete many clips efficiently.
Selecting Multiple Clips
Checkbox Selection
Each clip card has a checkbox that appears on hover:
- Hover over a clip to reveal the checkbox (top-right corner)
- Click the checkbox to select or deselect
- Hold Shift and click a second checkbox to select the entire range between the two
- Use the Select All checkbox in the toolbar to select all visible clips
Selected clips show a ring highlight and a checkmark indicator.
Marquee Selection
Click and drag on the empty space between clip cards to draw a selection rectangle. Any clip that the rectangle touches gets selected -- just like selecting files in Finder or Explorer.
- Click on the empty space in the gallery grid (between or after cards)
- Drag to draw a selection rectangle
- Release to confirm the selection
Modifier keys:
- Plain drag: Replaces the current selection with the marquee selection
- Shift + drag: Adds the marquee selection to any existing selection
Marquee selection works in both the normal gallery view and folder mode.
Selection Indicator
When clips are selected:
- A count appears showing "N selected"
- A bulk action bar slides up at the bottom of the window
- A Cancel button lets you clear the selection (or press Esc)
Bulk Context Menu
The action bar is not the only way to reach these operations. With more than one clip selected, right-click any of the selected clips (or press Cmd/Ctrl + Enter on a focused selected card) to open the bulk actions as a context menu right where the pointer is.
The menu mirrors the action bar -- Tag, Set Expiration, Clear Expiration, Copy, Download, Compare, Archive/Restore, Delete, any applicable plugin bulk actions, and Deselect All. Labels carry the selection count (for example Delete 3 clips) so it is always clear the action applies to the whole selection.
Right-clicking a clip that is not part of the selection opens the normal single-clip context menu instead, and so does right-clicking when only one clip is selected. The selection is left untouched either way.
Available Bulk Actions
Copy
Copy all selected clips as files to the system clipboard:
- Select clips
- Click Copy in the action bar (or press C)
- All selected clips are placed on the system clipboard as file references
You can also press Cmd/Ctrl + C as an alternative.
Copy as files is supported on macOS (via NSPasteboard) and Windows (via PowerShell). On Linux, this action is not available.
Tag
Apply or remove tags from all selected clips:
- Select clips
- Click Tag in the action bar (or press T)
- Check or uncheck tags in the popover
- Create a new tag and apply it immediately from the same popover
Tag tree exclusivity is enforced per clip -- adding a tag from one tree automatically removes any existing tag in the same tree. See Tags for details on tree exclusivity.
Compare
Compare two images side by side:
- Select exactly two image clips
- The Compare button appears in the action bar
- Click to open the comparison modal
This button only appears when exactly two clips with image/* content types are selected.
Archive
Move all selected clips to the archive:
- Select clips
- Click Archive in the action bar (or press E)
- All selected clips move to Archive
When you are viewing the Archive, this button changes to Restore and moves selected clips back to the main gallery.
The bulk archive operation currently always sets clips to archived (is_archived = 1) regardless of context. Clicking Restore in the archive view re-archives the selected clips instead of restoring them. Use single-clip restore via the context menu as a workaround.
Download as ZIP
Export all selected clips as a single ZIP file:
- Select clips
- Click Download in the action bar (or press Cmd/Ctrl + D)
- Choose a save location in the native file dialog
- A ZIP file is created containing all clip contents
The default filename is clips_YYYYMMDDHHMMSS.zip. Inside the archive:
- Clips with an original filename are stored as
{id}_{originalname}(e.g.42_photo.png) - Clips without a filename are stored as
clip_{id}.{ext}, where the extension is derived from the MIME type
Set Expiration
Apply an expiration to all selected clips:
- Select clips
- Click Set Expiration in the action bar (or press X)
- Choose a preset from the popover (15m, 1h, 6h, 24h, 7d)
- The expiration timer starts immediately for all selected clips
See Auto-Delete for details on how expiration works.
Clear Expiry
Remove expiration from all selected clips:
- Select clips that have active expirations
- Click Clear Expiry in the action bar
- All selected clips revert to no expiry
The Clear Expiry button only appears when at least one selected clip has an active expiration timer.
Delete
Remove all selected clips permanently:
- Select clips
- Click Delete in the action bar (or press D)
- Confirm the deletion
- All selected clips are permanently removed
Bulk delete cannot be undone. Make sure you've selected the right clips before confirming.
Keyboard Shortcuts
When clips are selected, these shortcuts are available:
| Shortcut | Action |
|---|---|
| C | Copy selected as files |
| Cmd/Ctrl + C | Copy selected as files |
| D | Delete selected |
| E | Archive / Restore selected |
| T | Open tag popover |
| X | Set expiration |
| Cmd/Ctrl + D | Download selected as ZIP |
| Esc | Clear selection |
Tips
- Click and drag on empty space to marquee-select multiple clips at once
- Use Shift-click to select a range of consecutive clips quickly
- Double-check your selection before deleting -- delete is permanent
- Consider archiving instead of deleting if you might need clips later
- For large exports, ZIP creation may take a moment
Related
- Image Comparison -- compare two selected images
- Tags -- bulk tagging workflow
- Auto-Delete -- bulk expiration actions
- Keyboard Shortcuts -- shortcut keys for bulk operations