Resource Versioning
Resources track file changes through content-addressable versioning. Each upload creates a new version record while deduplicating storage by SHA1 hash.
How Versioning Works
When you upload a new version of a resource:
- Stores the new file using content-addressable storage (files are stored by their SHA1 hash)
- Creates a version record with metadata (file size, dimensions, content type, etc.)
- Updates the resource to point to the new version
- Regenerates thumbnails and previews automatically
- Preserves all previous versions for comparison and restoration
Content Deduplication
Files are stored by hash, meaning identical files are only stored once regardless of how many versions reference them. This saves disk space when:
- You restore a previous version (creates a new version record but reuses the existing file)
- Multiple resources share the same file content
- A version is deleted but other versions still reference the same file
Edits That Create Versions
Uploading a new file is not the only way to add a version. The in-place editing operations on the resource detail page also produce a new version, so the result appears in the version history and the previous content is preserved:
- Rotate an image
- Crop an image (when its Save as choice is left on New version)
- Trim a video to a time range
Each of these stores the edited file as a new version, makes it the current version, and clears cached thumbnails. See Managing Resources for how to run them. (Uploading a custom thumbnail does not create a version -- it only replaces the stored preview.)
A crop saved as a New resource instead produces no version at all: the source is untouched and the crop becomes its own resource, with its own version 1.
Version History Panel
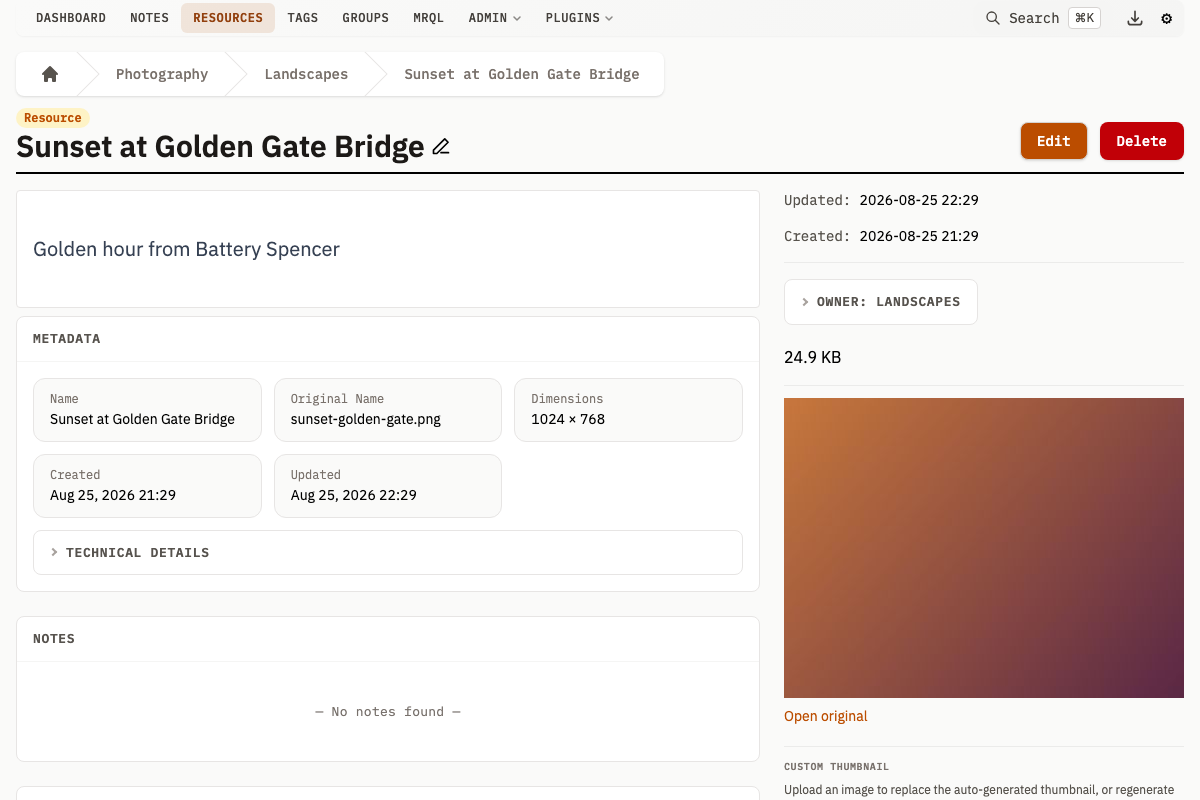
The resource detail page includes a Versions panel listing all versions of the file.
For each version, you can see:
- Version number (v1, v2, v3, etc.)
- Creation date
- File size
- Comment (optional description of what changed)
- Current badge for the Current Version
- Image thumbnail that opens that version in the viewer; video versions have a clickable film icon
Actions Available
| Action | Description |
|---|---|
| Download | Download that specific version's file |
| Restore | Create a new version from an older one, making it current |
| Delete | Remove a version (cannot delete the current version or the last remaining version) |
| Upload New | Add a new version with an optional comment |
Versions in the Media Viewer
Choose Versions in the viewer toolbar, or press H, to open the version strip above the media. It shows every Resource Version, with the Current Version marked as current. Select an image or video to view its content. Other file types remain visible in the history but cannot be selected. Dates and sizes appear on wider screens; each entry's tooltip carries its comment.
The Displayed Version changes only the media and its dimensions. Info and Edit Tags continue to describe and edit the Resource. While a Historical Version is displayed, a Version N of M badge remains visible even if you close the strip. Choose Back to current to return to the Current Version. Rotate and Crop are disabled until you return.
Navigating to another Resource or closing the viewer resets the Displayed Version. Press Escape to close the viewer. Restore, Download, and Compare remain on the resource page, linked from the strip.
Comparing Versions
Select two versions to compare by clicking the Compare button in the version panel, then checking two versions and clicking Compare Selected.
When a resource has exactly two versions, clicking Compare automatically selects both of them, so Compare Selected is ready immediately -- no checkbox clicks required.
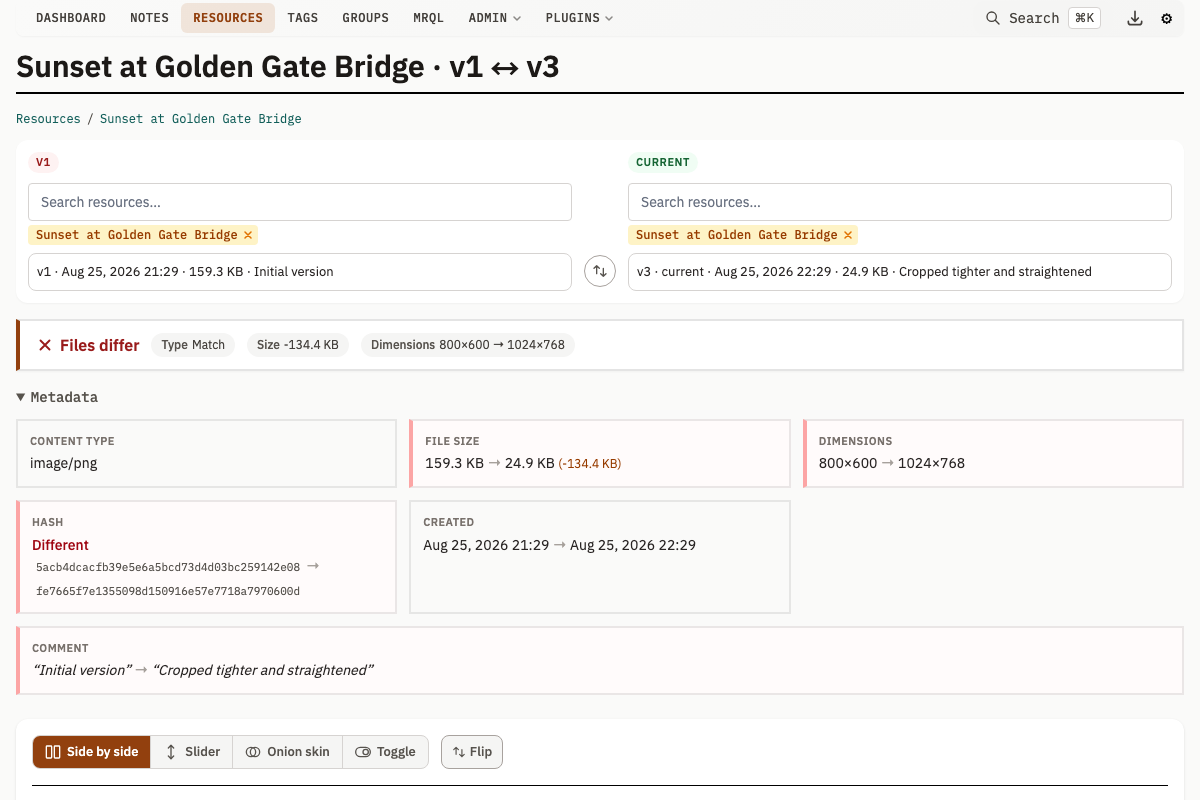
The comparison page shows:
Metadata Comparison Table
A side-by-side table displaying:
- Content type (with match/mismatch indicator)
- File size (with delta showing increase or decrease)
- Dimensions (for images)
- Hash match status
- Creation dates
- Comments
Content Comparison
Different comparison modes are available depending on file type:
Image Comparison
For images, five comparison modes are available:
| Mode | Description |
|---|---|
| Side-by-side | Both versions displayed next to each other |
| Slider | Drag a slider to reveal one image over the other |
| Onion skin | Overlay with adjustable opacity slider |
| Toggle | Click or press Space to switch between versions |
| Difference | Blend the versions so identical pixels are black and changes remain visible |
In Toggle, Blink alternates the versions automatically. It starts paused on every visit; choose a rate from 2 to 8 flashes per second, then press Blink to play or pause. Blink stays unavailable when your system requests reduced motion and stops if that preference is enabled while it is playing. Above three flashes per second, the comparator reduces image contrast to keep arbitrary image pairs below the accessibility flash threshold.
The four overlay modes -- slider, onion skin, toggle and difference -- draw both versions inside one frame, so how each version is measured into that frame decides whether they line up at all. Scale sets that:
| Scale | Description |
|---|---|
| Relative | Each version at its true size against the other. A version scanned at twice the resolution of the one before it is drawn twice as large. This is the default. |
| Fit | Each version grown until an edge touches the frame. Two versions sharing one aspect ratio line up exactly, which makes this the mode for a rescan, a re-export, or any change that moved only the resolution. |
| Stretch | Each version distorted onto the whole frame. |
Stretch is right for a re-encode that changed the aspect ratio and wrong for a crop: it scales the crop up to the shape of the original, so the two versions look alike and you cannot see what was cut.
Anchor decides where a version sits in whatever space the frame leaves it. Versions are centred by default, which suits a photograph. Anchor them to the top-left corner for a document or a screenshot, where content is flush to a corner and centring puts the two versions half the size difference apart. Stretch fills the frame exactly, so there is no space left to anchor and the control is unavailable while it is selected.
Scale and anchor apply to the overlay modes only, and are hidden in Side-by-side, where each version has a pane of its own.
A pair whose dimensions neither the stored file metadata nor the browser reports leaves nothing to scale or anchor against. Both controls are shown as unavailable rather than acting on nothing. This geometry rule is separate from Pixel diff's explicit HEIC/TIFF policy below: a TIFF with stored dimensions can still use Scale and Anchor even though Pixel diff refuses it.
Aligning two versions by hand
Scale decides how large each version is drawn. It cannot help a pair that is already the right size and simply out of register: a page placed differently on the scanner glass, a document re-photographed a few percent off, a screenshot taken at a different scroll offset. Align hands that correction to you.
Press Align to arm it, then move one version over the other:
| Input | Effect |
|---|---|
| Drag the image | Move it under the pointer |
Arrow keys | Move it one pixel, or ten with Shift |
- and = | Resize it by 1% |
Shift with - or = | Resize it by 10% |
| Scroll wheel | Resize it by 1% |
R | Put it back |
Pixels are pixels of the shared frame, not of your screen, so an offset means the same thing after you resize the window. A version can be moved until a quarter of it is left in the frame, and resized to between 25% and 400%.
The current offset is shown beside the controls as +12, -4, 103% and can be cleared at any time with Reset, which clears the resize along with the offset. Align stays armed until you press it again, so a correction can be made in small steps.
Align once, then compare in every mode. The offset holds across Slider, Onion skin, Toggle and Difference, and across a change of scale, so you can line the two versions up in one mode and read the result in another.
Flip exchanges which version leads while keeping the alignment: the correction is inverted rather than discarded, so flipping back and forth is how you check that it took.
While Align is armed the arrow keys move the version rather than the reveal position or the onion-skin opacity. Controls that answer the arrow keys themselves keep them: the scale selector still moves between Relative, Fit and Stretch while it has focus, and the slider handle keeps its own drag and its own arrow keys throughout.
Measuring changed pixels
Press Pixel diff in any overlay mode to add a magenta mask over changed pixels. The comparison banner then reports the percentage of the painted overlap that changed. Pixels painted by only one version are excluded -- the banner's size and dimensions already describe missing area -- while every visible colour difference inside the overlap counts. Partially transparent pixels are compared as they appear over the frame background, so two different RGBA values that paint the same colour remain unchanged. In flash-safe Blink, the measurement follows the grey background and reduced contrast too. The mask stays armed when you switch modes and follows scale, anchor, flip and manual alignment.
For a large pair, the page shows the combined megapixel count and asks before computing. Pixel diff does not support HEIC or TIFF, even where a browser can display one of those formats; the control remains available to focus but states why it cannot act.
Text Comparison
For text files (plain text, code, markdown, etc.):
| Mode | Description |
|---|---|
| Unified | Single view with additions (green) and deletions (red) marked |
| Side-by-side | Two columns showing each version with changes highlighted |
The comparison also shows statistics: lines added and lines removed. The toolbar carries three further controls:
- Previous change and Next change, which jump between changed regions and report the position as "n of m changes"
- Expand all, which opens the unchanged regions the diff folds away by default
- Copy diff, which puts the diff on the clipboard as a patch
PDF Comparison
PDFs get their own panel. It shows a document icon, the file size and a download link for each side, with a Load in viewer button that swaps in two inline frames rendering the two documents side by side.
Binary and Other Files
For files that are neither image, text, nor PDF, you can:
- See thumbnails (if available)
- View file metadata
- Download both versions for local comparison
Cross-Resource Comparison
You can also compare versions between different resources. This is useful when:
- Finding which version of two similar files is newer
- Comparing files that may be related but stored separately
- Investigating potential duplicates
To compare across resources, use the resource picker on the comparison page to select different resources for each side.
Dynamic Side Labels
The compare header labels change based on context:
- Same-resource comparisons: labels show version numbers (e.g.,
v1,v5). If one of the selected versions is the current one, that side is labeledCurrent. If neither is current and they differ, the higher-numbered version is labeledNewerand the lowerOlder. - Cross-resource comparisons: labels show
LeftandRight.
Merge Panel
When comparing two different resources (cross-resource), and both sides are set to their respective current versions, a Merge panel appears at the bottom of the comparison page.
The merge panel includes:
- A Keep loser as older version of winner checkbox (
KeepAsVersion). When checked, the losing resource's file is saved as an older version on the winner before the loser is deleted. - ← Left Wins: merges the right resource into the left, redirecting to the left resource.
- Right Wins →: merges the left resource into the right, redirecting to the right resource.
Restoring a Version
To restore a previous version:
- Navigate to the resource's detail page
- Open the Versions panel
- Find the version you want to restore
- Click Restore
Restoring creates a new version with the content of the old version. It does not overwrite history - you can always see the full version timeline.
The restore action:
- Creates a new version (e.g., if current is v5 and you restore v2, you get v6 with v2's content)
- Updates the resource to use the restored content
- Regenerates thumbnails
- Logs the action with a default comment: "Restored from version X"
Uploading New Versions
To upload a new version:
- Navigate to the resource's detail page
- Open the Versions panel
- Use the file input at the bottom
- Optionally add a comment describing the changes
- Click Upload New Version
Add a comment describing the change (e.g., "Fixed typo in title", "Higher resolution scan").
Storage Implications
Disk Space
Each unique file is stored once. Version records are small -- roughly a few hundred bytes of metadata each -- so the main storage cost is the actual file content.
To estimate storage needs:
- Count unique file content (not versions)
- Consider that restored versions reuse existing files
- Deleting versions may or may not free space depending on references
Database Growth
Each version adds one row to the resource_versions table. For large databases with millions of resources, this can add up. Consider periodic cleanup of old versions.
Cleanup Options
Two cleanup modes are available:
Per-resource cleanup:
- Keep only the last N versions
- Delete versions older than X days
- Dry-run mode to preview what would be deleted
Bulk cleanup:
- Clean versions across many resources at once. Supplying an owner group scopes the cleanup to resources owned by that group; with no owner scope it runs across every resource in the database
- Same criteria options (keep last N, older than X days)
- Dry-run mode is strongly recommended before an unscoped run
Version deletion is permanent. Always use dry-run mode first to verify what will be deleted.
API Endpoints
| Method | Path | Description |
|---|---|---|
GET | /v1/resource/versions?resourceId={resourceId} | List all versions for a Resource |
GET | /v1/resource/version?id={versionId} | Get a single version by ID |
GET | /v1/resource/version/file?versionId={versionId} | Download a version's file |
POST | /v1/resource/versions?resourceId={resourceId} | Upload a new version (multipart: file, comment) |
POST | /v1/resource/version/restore | Restore a previous version (resourceId, versionId, comment) |
DELETE | /v1/resource/version | Delete a version (resourceId, versionId) |
POST | /v1/resource/version/delete | Delete a version (POST alias for DELETE) |
POST | /v1/resource/versions/cleanup | Cleanup old versions for a single Resource (JSON body) |
POST | /v1/resources/versions/cleanup | Bulk cleanup across Resources |
GET | /v1/resource/versions/compare | Compare two versions side-by-side |
Migration from Older Databases
On startup, a background migration automatically creates actual v1 records for Resources created before version was introduced:
- Finds Resources with no
current_version_id - Processes in batches of 500 (with 10ms sleep between batches)
- Creates a v1 record from the current Resource state
- Logs progress every 10,000 Resources
A second pass then syncs each Resource's hash, location, content type, dimensions and size from its current version, in batches of 100, repairing Resources whose fields have drifted. -skip-version-migration skips both passes.
The migration does not block startup. For databases with millions of Resources, skip it and run during a maintenance window:
| Flag | Env Variable | Default |
|---|---|---|
-skip-version-migration | SKIP_VERSION_MIGRATION=1 | false |
./mahresources -skip-version-migration -db-type=SQLITE -db-dsn=./mahresources.db -file-save-path=./files