Managing Resources
Resources are files of any type: images, documents, videos, or anything else you want to store and organize.
Uploading Resources
File Upload
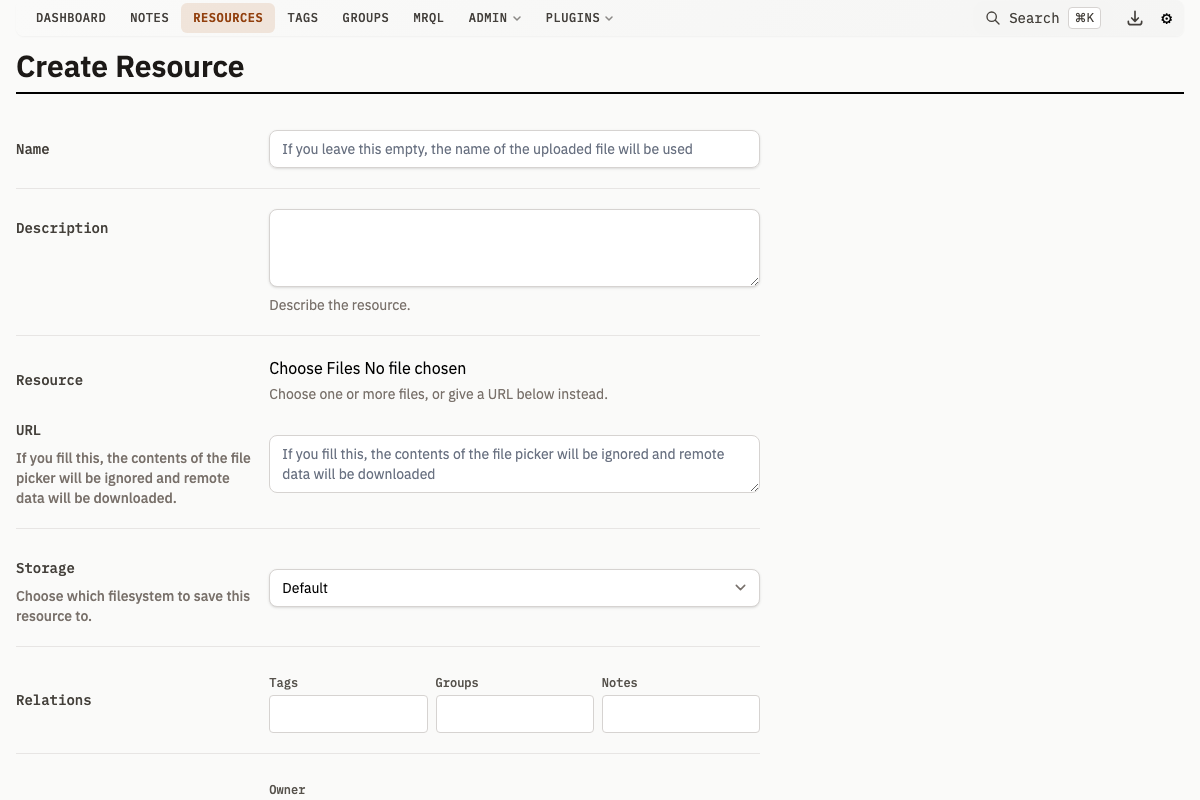
- Navigate to Resources in the top menu
- Click the Create button
- Use the file picker to select one or more files
- Fill in optional metadata:
- Name - Display name (defaults to filename if left empty)
- Description - Text description of the resource. Type
@to mention and link to notes, groups, or tags (see Mentions) - Tags - Labels for organization
- Groups - Associate with groups
- Notes - Link to existing notes
- Owner - The group that owns this resource
- Resource Category - Classify the resource type
- Series - Group related resources into a series
- Storage - Which filesystem to save the file to. Shown only when alternative file systems are configured (
-alt-fs) - Meta - Custom key-value metadata
- Click Save to upload
You can upload multiple files at once by selecting them in the file picker.
Bulk Uploads
A small selection is posted as one request, exactly as it always was. A large one is not: above upload_widget_file_threshold files (10 by default) or upload_widget_size_threshold bytes (1 GiB by default), the page sends one request per file, upload_concurrency at a time (3 by default). A line under the file picker tells you before you click Save that the selection has crossed the threshold. See Runtime Settings to change the three values.
While the batch runs, a progress panel replaces the form:
- Progress is aggregated over bytes, not files, so one large file among many small ones does not sit at zero and then jump
- Only files that are in flight or have failed get a row of their own; completed files collapse to a count
- Cancel stops the batch, leaving the files already uploaded in place
- Retry failed re-sends the failures that are worth re-sending. A 409 duplicate, a file the browser refused on size, and any other deterministic 4xx are excluded, because the same bytes would fail the same way; a duplicate's row links to the resource it collided with instead
max_upload_size bounds one request, so under this widget it becomes a per-file limit rather than a limit on the batch. Each file is checked against it in the browser before anything is sent.
When every file succeeds, a single-file upload opens that resource and a batch opens the owning group, or the resource list when no owner was chosen. A batch that partially failed stays on the page so you can retry.
URL Import
Import resources directly from web URLs:
- Navigate to Resources > Create
- Instead of using the file picker, paste a URL into the URL field
- Optionally check Download in background for large files
- Fill in metadata as desired
- Click Save
The URL field accepts multiple URLs (one per line) for batch imports.
Background Downloads
For large files or slow connections, enable Download in background:
- The download starts immediately but you can navigate away
- Progress is tracked in the jobs panel, opened from the download icon in the header
- Failed downloads can be retried from the panel, or later from the Downloads page -- a failed download is kept for a week by default, so it survives the panel and a server restart
Paste Upload
Paste images or files from the clipboard to create resources:
- Copy an image or file to the clipboard (e.g., screenshot, copied image from a webpage)
- Navigate to a group or note detail page, or a list view filtered by a single owner
- Press Ctrl+V / Cmd+V -- a modal appears showing a preview of the pasted content
- Set optional fields: tags, resource category, series
- Click Upload
The paste upload modal supports:
- Batch uploads -- paste multiple items and upload them together
- Duplicate detection -- if a file with the same hash already exists, the modal shows the existing resource ID
- Context awareness -- when pasting on a group or note detail page, or a list view filtered by a single owner, the uploaded resource is associated with that entity automatically
- Auto-close -- the modal closes and the page refreshes after a successful upload
Pasted text is uploaded too: rich text becomes an .html resource and plain text a .txt resource, each named after the moment it was pasted and previewed in the modal as a text snippet rather than a thumbnail.
Viewing Resources
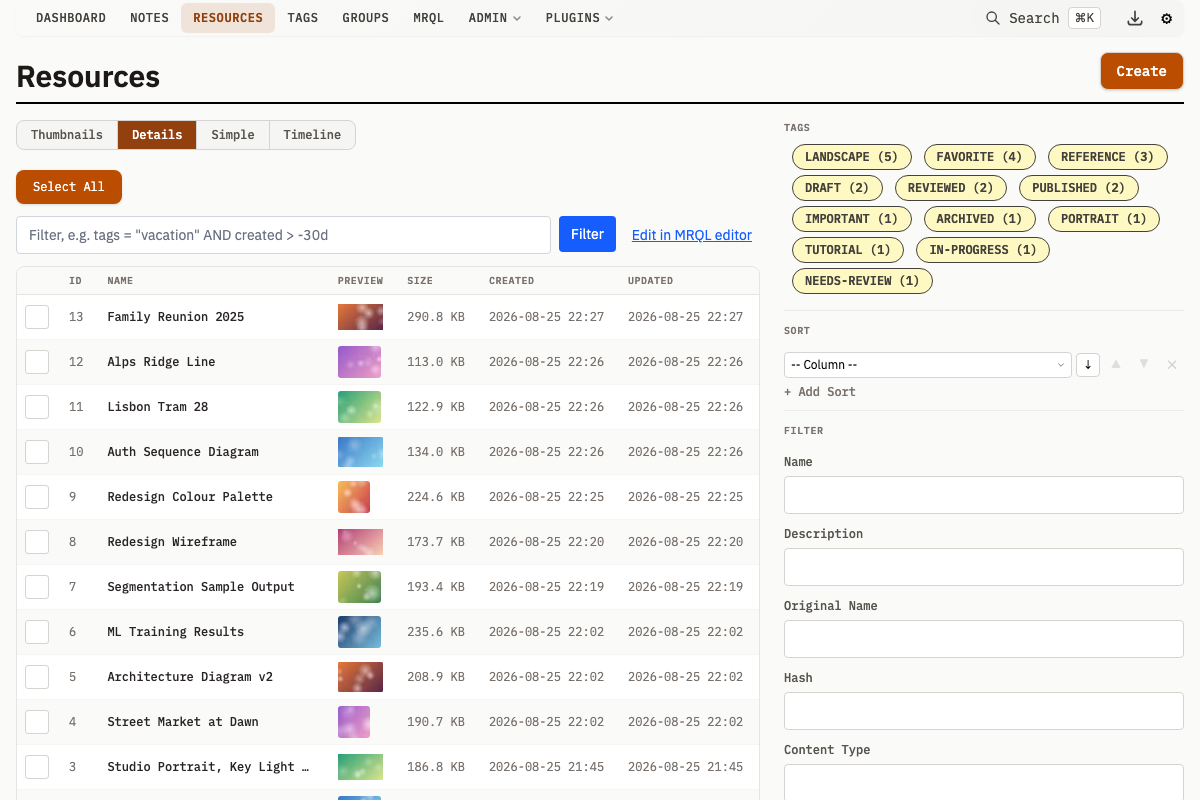
Resource List
Resources display as cards. Each card shows:
- Thumbnail preview (click to open in lightbox)
- Resource name (click for detail page)
- File size, owner, category with avatar
- Expandable description
- Tags with inline edit button
- Checkbox for bulk selection
Resource Detail Page
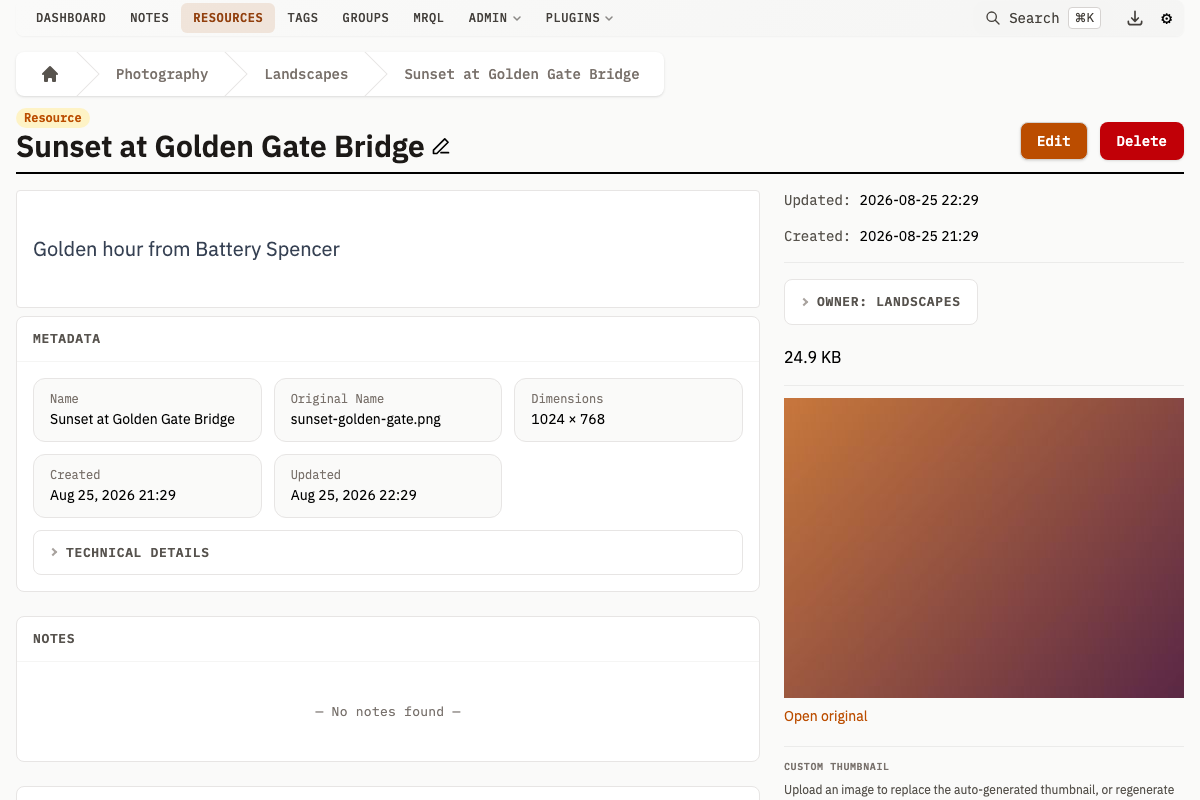
Click a resource name to view its detail page, showing:
Main Content
- Full description
- Metadata panel (name, original name, dimensions, timestamps) with collapsible technical details (ID, hash, location, storage location)
- Related notes
- Related groups
- Series siblings (if the resource belongs to a series)
- Similar resources (when the hash worker is running)
Sidebar
- File size
- Preview thumbnail
- Tags (with inline editing)
- Image operations (for image files)
- Custom metadata
Previewing Files
Click a resource thumbnail to open images in the lightbox, view PDFs in the browser, or download other file types. The lightbox supports arrow-key navigation across all visible resources.
Lightbox Tag Editing
Press T to open the Edit Tags panel in the lightbox. This panel lets you add/remove tags quickly using two methods:
Tag Search: Type in the search field at the top (press 0 to focus it) to find and add tags by name.
Quick Slots: The 3x3 grid below provides instant keyboard-driven tag toggling:
- Tabs: Four customizable tabs (QUICK 1-4) and a RECENT tab. Switch with Z/X/C/V/B keys.
- Assigning tags: Click an empty slot, then search for a tag to assign it. Slots can hold one or multiple tags.
- Toggling: Press 1-9 (matching the numpad layout: 7-8-9 top row, 4-5-6 middle, 1-2-3 bottom) to toggle the tags in that slot on/off for the current resource.
Color indicators show each slot's state:
- Green: All tags in the slot are on the resource (click/press to remove)
- Amber: Some tags are on the resource (click/press to add the missing ones)
- Gray: No tags from the slot are on the resource (click/press to add all)
Expanding Multi-Tag Slots
When a slot contains multiple tags, you can drill into it to toggle tags individually:
- Keyboard: Hold a number key (1-9) for 400ms on a multi-tag slot. A progress bar at the bottom of the slot shows the hold duration.
- Mouse: Click and hold a multi-tag slot card for 400ms.
- A short press (tap) still toggles all tags in the slot as a batch.
In expanded mode:
- The tab bar is replaced with a Back button and "Slot N tags" label
- Each tag from the slot appears as its own card in the 3x3 grid
- Press 1-9 to toggle individual tags
- Tags show green (on resource, press to remove) or gray (not on resource, press to add)
Exiting expanded mode:
- Press Escape, 0, Z, X, C, V, or B
- Click the Back button
- Click outside the quick tag panel
- Click any tab button (also switches to that tab)
| Key | Action |
|---|---|
| T | Toggle Edit Tags panel |
| 1-9 | Toggle slot (tap) or expand slot (hold) |
| 0 | Focus tag search (or exit expanded mode) |
| Z/X/C/V | Switch to QUICK 1-4 (or exit expanded mode) |
| B | Switch to RECENT tab (or exit expanded mode) |
| Escape | Exit expanded mode, or close lightbox |
Editing Resources
Edit Page
- Click Edit on any resource detail page
- Modify fields as needed:
- Name
- Description
- Tags
- Groups
- Notes
- Owner
- Resource Category
- Series
- Custom metadata
- Click Save to apply changes
Note: You cannot replace the file itself when editing. To update a file, upload a new version and use the versioning system.
Inline Name Editing
On the resource detail page, click the resource name in the header to edit it directly. Changes save automatically when you click away or press Enter.
Tag Management
Manage tags directly from the resource detail page:
- Click the + button in the Tags section
- Search for and select tags
- Tags are added immediately
To remove a tag, click the x on the tag label.
Image Operations
Image resources have additional operations available in the sidebar:
Rotate
Rotate an image by a specified number of degrees. The UI provides a Rotate 90 Degrees button in the sidebar; the API accepts any integer angle:
- Navigate to the image resource
- In the sidebar, find Rotate 90 Degrees
- Click Rotate
Rotation creates a new version with the rotated content and clears cached thumbnails.
Crop
Crop an image to a rectangular region. Cropping is available for raster image files.
- Navigate to the image resource
- In the sidebar, find Crop and click Crop… to open the crop dialog
- Under Save as, choose New version (the default) or New resource
- Drag on the image to select the crop area, or type exact pixel values for X, Y, Width, and Height
- Optionally pick an Aspect ratio (Free, 1:1, 16:9, 4:3, or Original) and add a Comment
- Click the button in the dialog footer to apply
The crop is also available from the image viewer (lightbox) through its Crop image button, with the same Save as choice.
Save as new version
The default. The cropped image replaces the resource's current content as a new version and cached thumbnails are cleared. The Comment is stored on that version.
Save as new resource
The source resource is left completely untouched -- no new version, no dimension change, no thumbnail invalidation. The crop is saved as a separate resource that inherits the source's owner, groups, tags, and resource category, is named <source name> (cropped), and records where it came from in its description along with the Comment. The crop dialog stays open with a link to the new resource, so several regions can be lifted out of one image in a row.
Identical content is deduplicated: cropping the exact same rectangle twice reports the resource that already holds it instead of creating a duplicate. The check covers what you can see, so a group-limited user is not told about a match outside their own group subtree.
Either way, JPEG and PNG images keep their format; GIF, WebP, BMP, and TIFF are re-encoded as PNG, and GIF animation is dropped. HEIC and AVIF images are decoded through the ImageMagick fallback (which must be installed) and re-encoded as PNG.
SVG and ICO files cannot be cropped -- re-upload them as PNG or JPEG first.
Recalculate Dimensions
If image dimensions appear incorrect:
- Navigate to the image resource
- In the sidebar, find Update Dimensions
- Click Recalculate Dimensions
This re-reads the image file and updates the stored width/height values.
Video Operations
Video resources have a trim operation available in the sidebar. Trimming requires FFmpeg.
Trim Video
Cut a video down to a single time range.
- Navigate to the video resource
- In the sidebar, find Trim Video
- Drag the range slider handles to set the start and end, or type exact Start (s) and End (s) values
- Optionally add a Comment
- Click Trim Video
Trimming creates a new version containing only the selected range and clears cached thumbnails. The output is always re-encoded as MP4 (H.264 video, AAC audio), regardless of the source format. Time values accept plain seconds, MM:SS, or HH:MM:SS.
Finding Similar Resources
Perceptual hashing finds visually similar images. On any image resource's detail page, the Similar Resources section shows matches as thumbnail cards sorted by similarity. Click Merge Others To This to combine duplicates into one resource.
This requires the background hash worker (enabled by default).
Deleting Resources
Single Resource
- Navigate to the resource detail page
- Click the Delete button in the header
- Confirm the deletion
Bulk Deletion
- In the resource list, select multiple resources using checkboxes
- Click the Delete Selected button in the bulk editor
- Confirm the deletion
Deleted files are backed up to the /deleted/ directory before the database record is removed. Files are only physically deleted from primary storage if no other Resources or versions reference the same hash. The backup naming format is {hash}__{id}__{ownerId}___{basename}.
Resource Metadata
Automatic Metadata
Automatically captured on upload:
- Original Name - The filename at upload
- Original Location - Source URL for imports
- Content Type - MIME type
- File Size - Size in bytes
- Hash - Content hash for deduplication
- Dimensions - Width/height for images
- Created/Updated - Timestamps
Custom Metadata
Add custom key-value pairs using the Meta Data section:
- In the create/edit form, find the Meta Data section
- Enter a key name
- Enter a value (supports text, numbers, JSON)
- Click + to add more fields
- Save the resource
Custom metadata is searchable and can be used in filters.
Free-Form Metadata Fields
The metadata editor renders dynamic key-value input rows. Each row has a key name field and a value field. Values are automatically coerced to typed JSON values:
| Input | Stored As |
|---|---|
true / false | Boolean |
null | Null |
42, 3.14 | Number |
2026-03-05 | Date string |
{"key": "val"} | JSON object |
| anything else | String |
Existing keys from other entities of the same type appear as autocomplete suggestions in the key name field, helping maintain consistent naming across resources.
Thumbnails
Thumbnails are generated automatically for supported file types:
| File Type | Requirements |
|---|---|
| Images | Built-in (HEIC/AVIF require ImageMagick) |
| SVGs | Built-in (oksvg rasterizer) |
| Videos | Requires FFmpeg |
| Office documents | Requires LibreOffice |
Thumbnails are generated on demand when first requested and cached in the database. For video files, the background thumbnail worker can pre-generate thumbnails.
Custom Thumbnails
You can replace the auto-generated thumbnail of any resource with your own image. The Custom Thumbnail controls appear in the sidebar next to the preview:
- Upload Image -- pick an image file (PNG, JPEG, WebP, or GIF) to use as the thumbnail
- Paste -- copy an image and paste it anywhere on the resource detail page to upload it as the thumbnail
- Regenerate from Source -- clear the custom and cached thumbnails so the next view regenerates from the original file
Uploading a custom thumbnail does not create a new version -- it only changes the stored preview. The image is resized so its longest edge is at most 1920px and stored as JPEG. For the full pipeline details, see Thumbnail Generation.
Download Cockpit
The Download Cockpit manages background URL downloads and plugin action jobs:
- Access it via the download icon in the page header, or press Cmd/Ctrl+Shift+D
- View active, pending, and completed downloads. The limit (
-download-cockpit-limit, 10 by default) applies only to finished downloads, which the Downloads page also lists: anything still working, and every export, import or plugin action, stays on the panel regardless, because their controls exist nowhere else. A footer says how many rows are hidden and links to the full list - Pause pending or downloading jobs, and resume paused ones
- Retry failed or cancelled downloads
- Cancel pending or downloading jobs
Each download shows:
- Source URL
- Progress percentage
- Download speed
Downloads page
/downloads is the durable record of background downloads. The jobs panel holds only what is still in memory -- a queue capped at 100 jobs, swept an hour after a job finishes, and emptied by a restart -- so this page is where a download from yesterday still exists.
It lists finished downloads plus any that are still running, and lets you:
- Filter by status (failed, cancelled, completed), by whether the download was ever retried, by a word in the URL or name, by when the download was submitted, by when it finished, and by why it failed. Retries answers both shapes a rerun takes: a download retried in place, and one resubmitted from its stored payload, which links the old row to the new attempt
- Submitted after/before and Finished after/before are different questions: a download queued on Monday can finish on Tuesday, and only the second pair answers "what finished last night?". A download that is still running has no finish time, so a finish window lists none
- Failure reason groups failures by what the error says: an HTTP error from the server, a timeout or stalled transfer, a refusal by the network policy, an unsupported or DRM-protected stream, a server limit, a file that could not be written, or a cancellation. It matches the error text, so it is best-effort, and the groups overlap: a gateway timeout is both an HTTP error and a timeout, and it is listed under either. Other keeps every failure none of the groups claim, which is where a failure the grouping has not learned about shows up. Error contains narrows further by a word in the message, and the two combine
- Retry a failed or cancelled download, whether or not its job is still in the queue. Completed downloads are not retryable: the file is already stored, and fetching it again would transfer it for nothing. A retry is also refused while any job in the queue is already downloading the same URL
- Delete rows individually or in bulk. A download that is still running or paused is refused -- cancel it first
- Select rows with the checkboxes to retry or delete several at once
Each row shows the status, the download name and URL, when it was submitted and when it finished, the error a failed attempt reported, how many attempts have been made, and a link to the resource a completed download created. A row that has already been retried names the job that retry produced, since a resubmitted download is a new job with its own row.
A retry is refused while the attempt it already started is queued or running, and while that attempt's own row still exists after it succeeded -- retrying then would fetch a second copy of a file you already have. Once the successful attempt's row has aged out of its retention window the old failure can be retried again, and a repeated download is caught by content hash rather than refused. Selecting several rows that record the same URL retries it once, and a row whose retry is running shows that attempt's progress instead of offering Retry and Delete. Restarting the server records whatever was downloading or paused as cancelled, so it is still listed and retryable afterwards. Deleting a row is refused while its retry is still running, for the same reason a running download cannot be deleted.
With authentication enabled, you see only the downloads you submitted; administrators see everyone's.
How long rows are kept is configurable at runtime on /admin/settings:
| Setting | Default | Covers |
|---|---|---|
| Failed download retention | 168h (one week) | failed and cancelled downloads |
| Completed download retention | 24h | completed downloads (the resource is unaffected) |